
Carve a Puppet Bird
The series trailer, launched in Autumn 2020
CARVE A PUPPET BIRD: online tutorial series
The FULL series is available to watch below, alongside notes and resources. I will endeavour to keep this page up to date in response to any feedback or queries I receive.
Learn how to CARVE a PUPPET BIRD, through my step-by-step tutorial series!
Suitable for beginner or intermediate carvers: adapt your project to suit your confidence level!
Learn handheld and tabletop wood carving techniques.
Complete your puppet using a small selection of handheld tools.
Learn painting and staining techniques for working with wood
Assemble your puppet and bring your creation to life!
CARVING KITS
Available to order now
The tutorials are FREE to watch, but to take part you will need to purchase one of my CARVING KITS. You can choose from two designs: a SWALLOW (recommended for beginners) or a GOLDFINCH (recommended for intermediates). Video 1 below explains the carving kits in more detail, and you can order a kit from my online shop…
KIT LIST
Available to download now
You will also need to source your own tools and other perishable materials eg. paints and glues. Video 2 below talks you through the CARVING TOOLS you will need. Video 3 below talks you through the PAINTS and ASSEMBLY TOOLS you will need. You can also download a full KIT LIST at the link below. I recommend viewing the videos and kit list together.
DONATE
Donate towards my tutorials
I have created these tutorial videos FOR FREE, which has been a huge investment of time and commitment. Therefore, if you feel moved to, you can DONATE towards my teaching practice. This will enable me to create more tutorials in the future! You can donate any amount, any time…just follow the link below, and a huge thank you in advance for supporting my work!
Testimonials…
Swallow carved by a tutorial participant- Jan 2021
I would love to hear your feedback on the series or see what you've made! You can get in touch will me through Facebook, Instagram, or just send me an email at sarah@sarahvigarsart.com. Testimonials are always welcome, but I am also interested to hear any queries or questions you might have. Any feedback I receive will help me improve my tutorials in the future.
"I’ve been super impressed by Sarah Vigars' video tutorials on how to carve this. The attention to detail is amazing. I reckon even a complete novice to wood carving could do this carving! Being just a casual whittler in the past I’ve learned loads!"
- participant feedback January 2021

SOME GUIDELINES on watching the VIDEOS
I recommend watching the videos in order
The table opposite indicates which videos to watch, depending on which bird you are making.
Please watch VIDEO 4 before beginning any carving, as it covers CARVING SAFETY
You might want to watch each video all the way through first, before beginning the activity
Each video has been broken down into CHAPTERS or STEPS for ease of watching
A 'SKIP AHEAD' arrow will appear when you can skip to the next chapter in each video
All tutorials and puppet designs are copyright Sarah Vigars
sarahvigarsart.com
All musical recordings are copyright Louis Bingham
louisbingham.bandcamp.com
Recommended participant Age: 16+
Please note that these tutorials are intended for ADULTS. They are not suitable for children as they involve the use of sharp equipment and epoxy glues. My carving kits are resources for adult learning. They are NOT intended as toys for children (and are not made to toy safety regulations). It is therefore your responsibility to supervise any child’s play with your finished puppet.
Introductions
(Video 1) Introduction part 1/3
CARVING KITS
(Video 2) Introduction part 2/3
CARVING TOOLS
(Video 3) Introduction part 3/3
PAINTS and ASSEMBLY TOOLS
SOME extra bits and pieces…
There is one extra tool that you will need for Video 27 that I forgot to mention in Video 3: you will need a small fine-tooth hand saw eg. a hacksaw, a coping saw or a Japanese pull saw.
In addition to the equipment listed, you might find some wood filler useful for attaching the tail in Video 31. I recommend 'Plastic Wood’ filler by Rustins.
You may also find some coarse sandpaper useful for sanding the control bars in Video 32.
ALLERGEN ADVICE - relating to the dyes, paints, oils and glues used in these videos
Bolgers Water Based Wood Stains are environmentally friendly, non-toxic, odourless and VOC free. They are unlikely to cause skin irritations.
Milk paint is made from casein (a protein found in milk) and lime. It is non-toxic, VOC-free & biodegradable. However, as it is a milk product, it may be unsuitable for severe dairy allergy sufferers. Use chalk paint or acrylic paint as an alternative.
Rustins Danish oil is not VOC free, though I only use it in very small quantities. It conforms to The Articles in Contact with Food Regulations and to the Toys (Safety) Regulations 1995, BS:EN71 Part 3. However, please note that Danish Oil contains tung oil which is extracted from nuts, and may therefore be unsuitable for severe nut allergy sufferers. Use at your own discretion, or contact Rustins Ltd for more information about their products.
Araldite glue and UHU glue are toxic if consumed and can cause skin irritations. Keep away from children. If you have sensitive skin wear gloves when using these glues. Both glues are also toxic if inhaled so use them in a well ventilated area, or wear a mask.
This list is not exhaustive: if you have sensitive skin, asthma, or severe allergies please take due caution when using any of the materials listed in these videos.
Carving BASICS
(Video 4) Carving BASICS part 1/2 - TOOL HANDLING and SHARPENING
---- CONTENTS OF THIS VIDEO --------------
0:00 General Introduction
1:18 SAFE TOOL HANDLING Introduction
1:41 KNIFE HOLDS...
1:50 The Whittling Hold
2:46 The Scoring Hold
3:40 GOUGE HOLDS...
3:51 The Thumb Hold
6:20 The Index Hold
7:50 The Pencil Hold
8:25 SHARPENING Introduction
8:57 Stropping your knife
10:35 Stropping your gouge with a slip strop
13:57 Making a slip strop with your offcuts
16:03 Sharpening stones
18:38 Knife and Chisel care
(Video 5) Carving BASICS part 2/2 - Working with WOOD GRAIN
----CONTENTS OF THIS VIDEO--------------
0:00 General Introduction
1:01 WOOD GRAIN explained (with the body carving blank)
3:30 LIME WOOD explained
4:56 The grain of the wing and tail carving blanks
5:36 TECHNIQUES for working with WOOD GRAIN...
5:40 Carving WITH the grain...
6:07 Carving ACROSS the grain
6:37 Carving DIAGONALLY ACROSS the grain
7:05 Carving into END GRAIN
7:32 Carving 'OVER HILLS'
8:10 Carving 'INTO VALLEYS'
A HEADS-UP on the wood in your CARVING KITS…
In an ideal world, every carving kit would behave the same when carved... but wood is never exactly the same! From an environmental perspective, I don't feel I can be overly choosey about the lime wood I use. Wherever possible, the wood is locally and sustainably sourced, which means I make the best of what's available, so here's a heads up about the wood in your carving kits:
The wing and tail carving blanks
Wherever possible, I am cutting the wing and tail carving blanks from dense, tight-grained lime wood. This means the wings and tail will be stronger and less fragile. Tight-grained wood is tougher to carve, but it should take detail well, which is especially relevant for the goldfinch wings!
The body carving blanks
In MANY cases I am cutting the body carving blanks from lighter, less dense lime wood. The grain of this wood is more widely spaced. This means it is softer and requires less force to carve, which should make roughing out the body quicker and easier. The finished puppet will also be much lighter as a result. HOWEVER, it may be more inclined to split or tear than denser heartwood, so go carefully, especially if you are carving the facial detail.
There ARE some exceptions to the above eg. some body blanks are cut from denser heartwood, if I happen to have a block of wood large enough. The body carving blank I am demo-ing with in Videos 6-8 is cut from a dense piece of lime wood as it was the only wood I had available at the time. Your kit piece may require less force to carve than mine. I recommend experimenting with your offcuts first to get a feel for it!
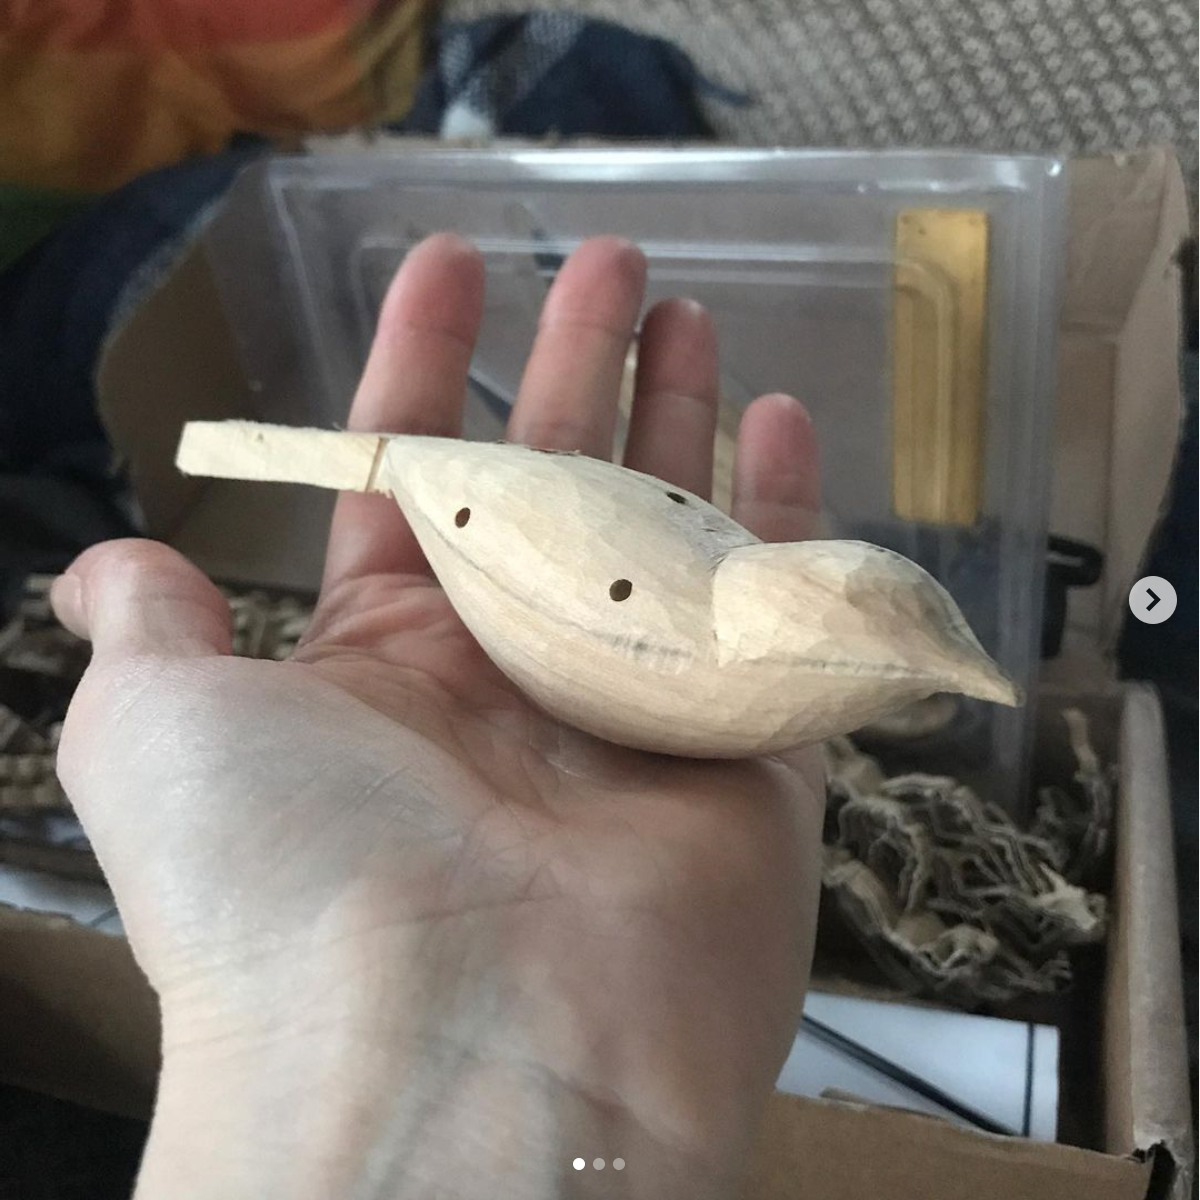
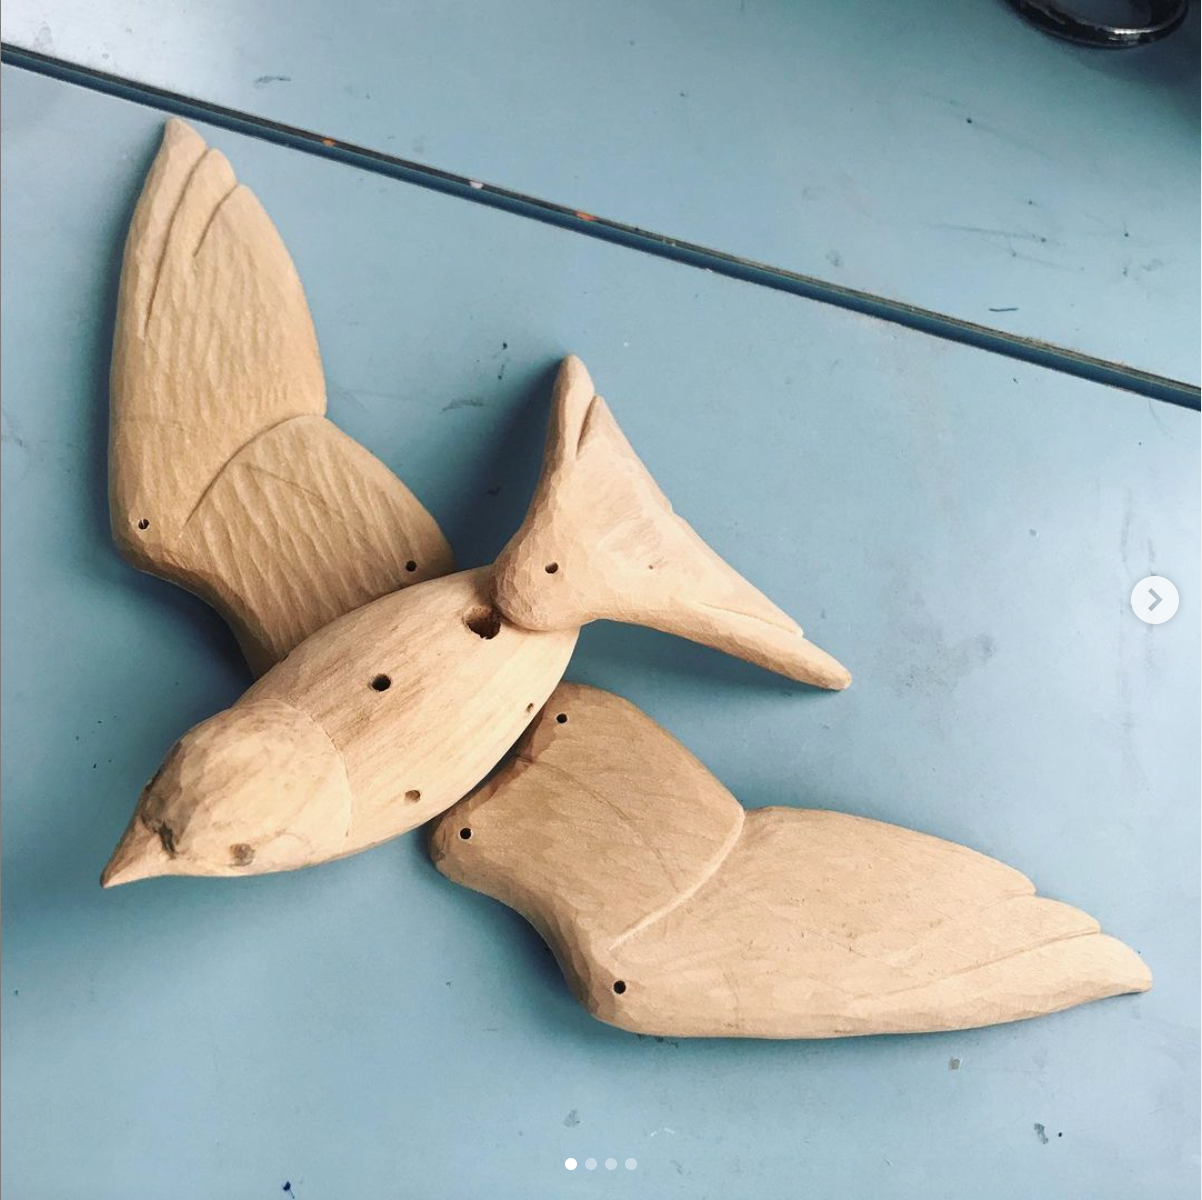
Roughing out the BODY
(Video 6) Roughing out the BODY part 1/3 - Working in 3-DIMENSIONS
----CONTENTS OF THIS VIDEO--------------
0:00 General introduction
1:12 The PROFILE, TOP, BOTTOM, and END-ON views (of a block of wood)
3:51 Unpacking the BODY CARVING BLANK
4:39 The PROFILE, TOP, BOTTOM and END-ON views (of the body carving blank)
6:37 SEGMENTS and HIGH POINTS
7:29 The carved GOLDFINCH body: BEFORE and AFTER
8:20 The carved SWALLOW body: BEFORE and AFTER
(Video 7) Roughing out the BODY part 2/3 - Carving the BELLY
----CONTENTS OF THIS VIDEO--------------
0:00 General introduction
1:15 Step 1 (carving 'downhill' towards the beak)
3:08 Step 2 (carving 'downhill' towards the tail)
4:49 Step 3 (blending out the peak)
5:49 Step 4 (repeat on the opposite side)
8:03 The carved GOLDFINCH belly
8:48 The carved SWALLOW belly
(Video 8) Roughing out the BODY part 3/3 - Carving the BACK and HEAD
----CONTENTS OF THIS VIDEO--------------
0:00 General introduction
2:31 Step 1 (carving into the neck)
4:00 Step 2 (carving 'downhill' towards the tail)
5:44 Step 3 (carving 'downhill' along the neck)
7:07 Step 4 (refining the neck)
8:23 Step 5 (carving 'downhill' towards the beak)
9:03 Step 6 (blending out the peak)
9:55 Step 7 (repeat on the opposite side)
11:00 The carved GOLDFINCH body
11:36 RECAP with the SWALLOW body
Roughing out the WINGS
(Video 9) Roughing out the WINGS part 1/4 - Introducing the WING BLANKS
(Video 10) Roughing out the WINGS part 2/4 - Carving the UNDERSIDE
----CONTENTS OF THIS VIDEO--------------
0:00 General introduction
1:58 Option 1 (carving ACROSS the grain)
4:38 Option 1 (continued)
5:36 Option 1 (continued)
6:25 Option 2 (carving ACROSS the grain, from the opposite direction)
7:55 Option 3 (carving DIAGONALLY across the grain)
8:45 Option 4 (carving the wing TIPS)
9:52 Option 5 (CLAMP-FREE carving)
11:14 Option 6 (more CLAMP-FREE carving)
(Video 11) Roughing out the WINGS part 3/4 - Carving the TOPSIDE
----CONTENTS OF THIS VIDEO--------------
0:00 General introduction
1:10 Step 1 (the SWALLOW wing)
3:01 Step 2 (the SWALLOW wing)
5:27 Step 3 (the SWALLOW wing)
6:44 The carved SWALLOW wing so far
7:06 Other carving options for the SWALLOW WING
8:19 The carved SWALLOW wings
8:40 Recap 1 (the GOLDFINCH WING)
9:38 Recap 2 (the GOLDFINCH WING)
10:44 The carved GOLDFINCH wings
(Video 12) Roughing out the WINGS part 4/4 - Carving the EDGES
----CONTENTS OF THIS VIDEO--------------
0:00 General Introduction
0:56 Step 1 (SWALLOW wing)
2:22 Step 1 (continued)
3:01 Step 2 (SWALLOW wing)
4:06 Step 3 (SWALLOW wing)
5:02 Step 4 (SWALLOW wing)
5:55 Step 5 (SWALLOW wing)
6:33 Step 6 (SWALLOW wing)
7:38 Step 7 (SWALLOW wing)
8:09 Step 8 (SWALLOW wing)
9:13 Step 9 (SWALLOW wing)
9:37 Step 10 (SWALLOW wing)
10:28 RECAPPING the steps with the GOLDFINCH wing
Roughing out the TAIL
(Video 13) Roughing out the TAIL part 1/4 - Introducing the TAIL BLANKS
(Video 14) Roughing out the TAIL part 2/4 - Swallow tail UNDERSIDE and TOPSIDE
(Video 15) Roughing out the TAIL part 3/4 - Carving the swallow tail EDGES
----CONTENTS OF THIS VIDEO--------------
0:00 General introduction
0:53 Step 1 (SWALLOW tail edges)
2:12 Step 2 (SWALLOW tail edges)
3:09 Step 3 (SWALLOW tail edges)
3:54 Step 4 (SWALLOW tail edges)
4:17 Step 5 (SWALLOW tail edges)
4:47 Step 6 (SWALLOW tail edges)
6:00 Step 7 (SWALLOW tail edges)
6:42 Step 8 (SWALLOW tail edges)
7:24 Step 9 (SWALLOW tail edges)
8:02 Step 10 (SWALLOW tail edges)
8:25 Step 11 (SWALLOW tail edges)
8:55 The SWALLOW tail after roughing out
(Video 16) Roughing out the TAIL part 4/4 - Carving the GOLDFINCH TAIL
----CONTENTS OF THIS VIDEO--------------
0:00 General introduction
0:48 Step 1 (GOLDFINCH tail)
2:34 Step 2 (GOLDFINCH tail)
3:57 Repeat Steps 1 and 2
6:06 Step 3 (GOLDFINCH tail)
7:31 Step 3 (continued)
7:52 Step 4 (GOLDFINCH tail)
9:12 Step 5 (GOLDFINCH tail)
10:02 Step 5 (continued)
10:39 Step 5 (continued)
11:16 Step 6 (GOLDFINCH tail)
12:32 Step 7 (GOLDFINCH tail)
12:52 Step 8 (GOLDFINCH tail)
13:18 The GOLDFINCH tail after roughing out
Carving the EYES and BEAK
(Video 17) Carving the EYES and BEAK part 1/3 - DRAWING in the features
(Video 18) Carving the EYES and BEAK part 2/3 - Carving the SWALLOW eyes and beak
----CONTENTS OF THIS VIDEO--------------
0:00 General introduction
1:45 Step 1 (carving the eyebrows)
4:47 Step 1 (continued)
6:05 Step 1 (continued)
7:02 Step 1 (continued)
7:28 Step 2 (carving the beak)
9:23 Step 2 (continued)
10:48 Step 2 (continued)
11:59 Step 2 (continued)
12:14 Step 3 (recap of techniques for carving the opposite side)
14:31 Some FINAL steps...
15:26 The SWALLOW eyes and beak, AFTER carving
(Video 19) Carving the EYES and BEAK part 3/3 - Carving the GOLDFINCH eyes and beak
----CONTENTS OF THIS VIDEO--------------
0:00 General introduction
1:36 Step 1 (carving the eye sockets)
4:24 Step 1 (continued)
5:28 Step 2 (repeat on the opposite side)
6:04 Step 3 (carving the beak)
7:28 Step 3 (continued)
8:57 Step 4 (repeat on the opposite side)
10:16 Some FINAL steps...
11:02 An extra OPTIONAL step (to refine the shape)
12:24 The GOLDFINCH eyes and beak, AFTER carving
Carving the wing FEATHERS
(Video 20) Carving the WING FEATHERS part 1/4 - DRAWING in the wing feathers
(Video 21) Carving the WING FEATHERS part 2/4 - Carving the SWALLOW wing feathers
----CONTENTS OF THIS VIDEO--------------
0:25 Step 1 (scoring in the topside feathers)
1:15 Step 2 (carving in the topside feathers)
3:52 Step 2 (continued)
4:08 Step 3 (scoring in the underside feathers)
4:29 Step 4 (carving in the underside feathers)
6:17 Step 5 (a bit of cleaning up)
7:01 Step 6 (scoring in the topside centre line)
7:26 Step 7 (carving in the topside centre line)
8:03 Repeat steps 6 and 7
8:52 Step 8 (a bit more cleaning up)
9:43 Step 9 (scoring in the underside centre line)
10:04 Step 10 (carving in the underside centre line)
11:08 Step 10 (continued)
12:12 Step 11 (carving in the edges)
13:51 Step 11 (continued)
16:08 Step 12 (final touches)
16:35 The SWALLOW wing, AFTER carving the feathers
(Video 22) Carving the WING FEATHERS part 3/4 - Carving the TOPSIDE GOLDFINCH wing feathers
----CONTENTS OF THIS VIDEO--------------
0:27 Step 1 (scoring in the topside feathers)
1:56 Step 2 (carving in feathers 1-2)
3:35 Repeat steps 1 and 2
4:19 Step 3 (cleaning up the ridges)
4:51 Step 4 (carving over the edge)
5:59 Step 4 (continued)
6:52 Step 5 (carving feathers 4-5)
8:24 Step 6 (carving feathers 6-7)
10:23 Step 7 (carving over the edges)
10:35 Optional extras...
11:31 The GOLDFINCH wing, AFTER carving the topside feathers
(Video 23) Carving the WING FEATHERS part 4/4 - Carving the UNDERSIDE GOLDFINCH wing feathers
----CONTENTS OF THIS VIDEO--------------
0:27 Step 1 (scoring in the underside feather lines)
1:03 Step 2 (carving in the first curves)
2:03 Alternate between steps 1 and 2
3:03 Step 3 (continue carving in feathers 1-4)
4:23 Step 3 (continued)
5:27 Step 4 (start carving feathers 5-6)
6:25 Step 4 (continued)
7:17 Step 5 (finish carving feathers 5-6)
8:07 Step 6 (a bit of cleaning up)
8:32 Step 7 (carving feather 7)
9:41 Step 8 (blending out and cleaning up)
10:08 Step 9 (carving the feather tips, intro)
11:06 Technique 1 (score in the sides)
11:35 Technique 2 ('turn and flick')
12:43 Technique 3 (slicing down then across)
13:57 Technique 4 (slicing with the grain)
14:56 Technique 5 (curving off the tips)
16:05 The GOLDFINCH wing, AFTER carving the feathers
Carving the tail FEATHERS
(Video 24) Carving the TAIL FEATHERS part 1/3 - DRAWING in the tail feathers
(Video 25) Carving the TAIL FEATHERS part 2/3 - Carving the SWALLOW tail feathers
----CONTENTS OF THIS VIDEO--------------
0:27 Step 1 (scoring in the topside feathers)
0:59 Step 2 (carving in the topside feathers)
2:01 Step 2 (continued)
3:09 Step 3 (scoring in the underside feathers)
3:56 Step 4 (carving in the underside feathers)
4:55 Repeat Steps 3 and 4
5:37 Step 5 (cleaning up)
6:25 Step 6 (whittling the feather tips)
7:47 Step 6 (continued)
8:35 Step 6 (continued)
9:40 Step 6 (continued)
11:45 The SWALLOW tail, AFTER carving the feathers
(Video 26) Carving the TAIL FEATHERS part 3/3 - Carving the GOLDFINCH tail feathers
----CONTENTS OF THIS VIDEO--------------
0:28 Step 1 (scoring in the topside feathers)
1:00 Step 2 (carving in the topside feathers)
2:51 Step 2 (continued)
3:33 Step 3 (scoring in the underside feathers)
4:11 Step 4 (carving in the underside feathers)
6:20 Step 4 (continued)
7:00 Step 5 (carving in the feather tips)
8:26 Step 5 (continued)
9:18 Step 5 (continued)
10:15 The GOLDFINCH tail, AFTER carving the feathers
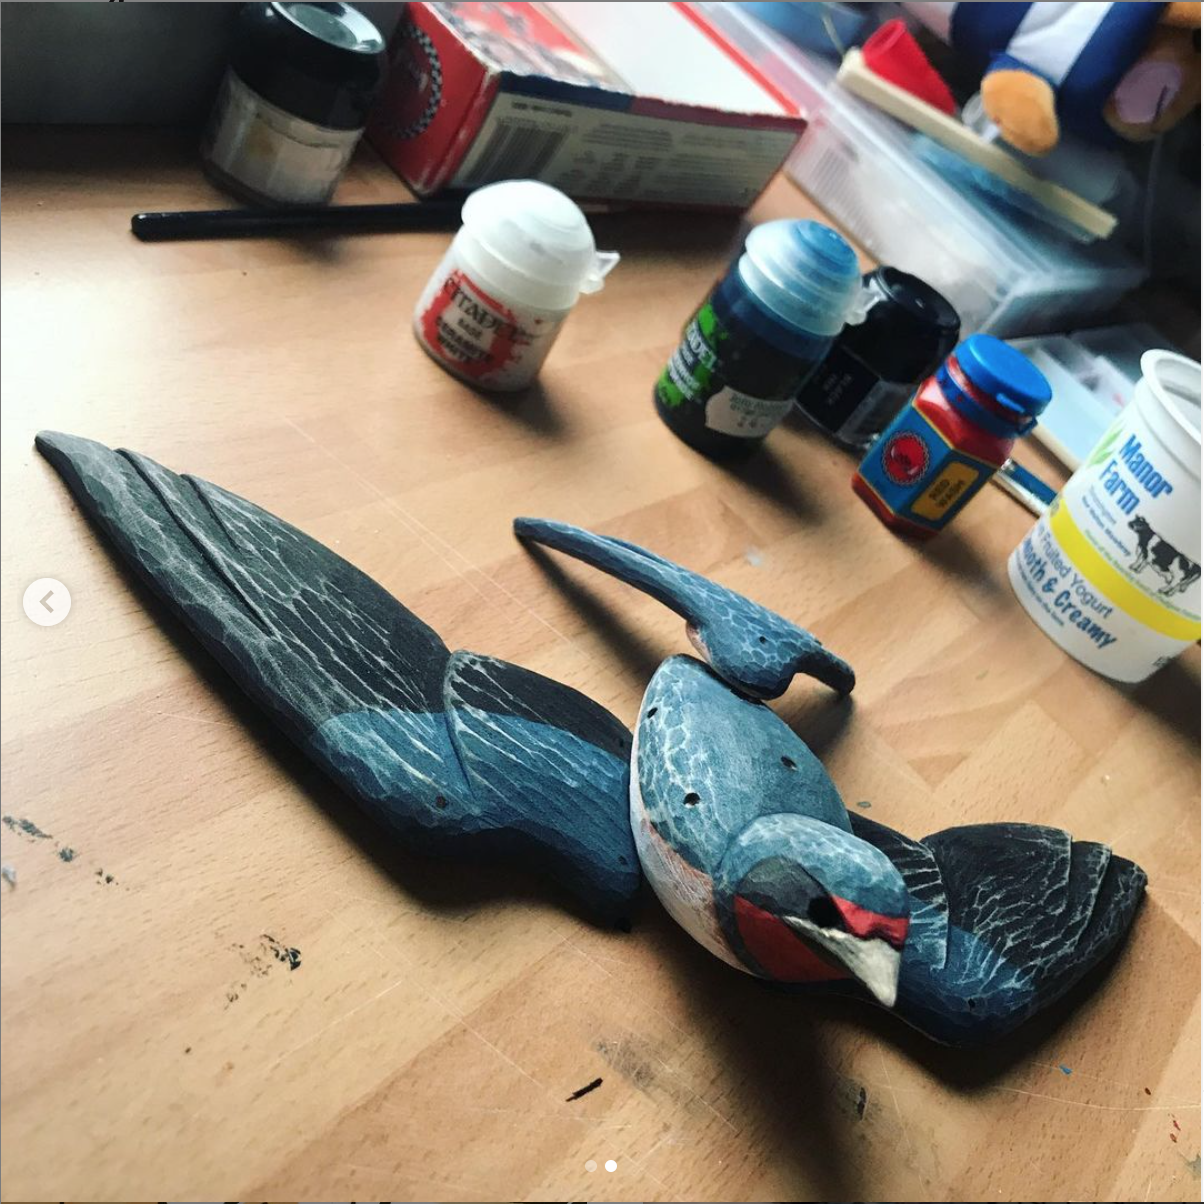
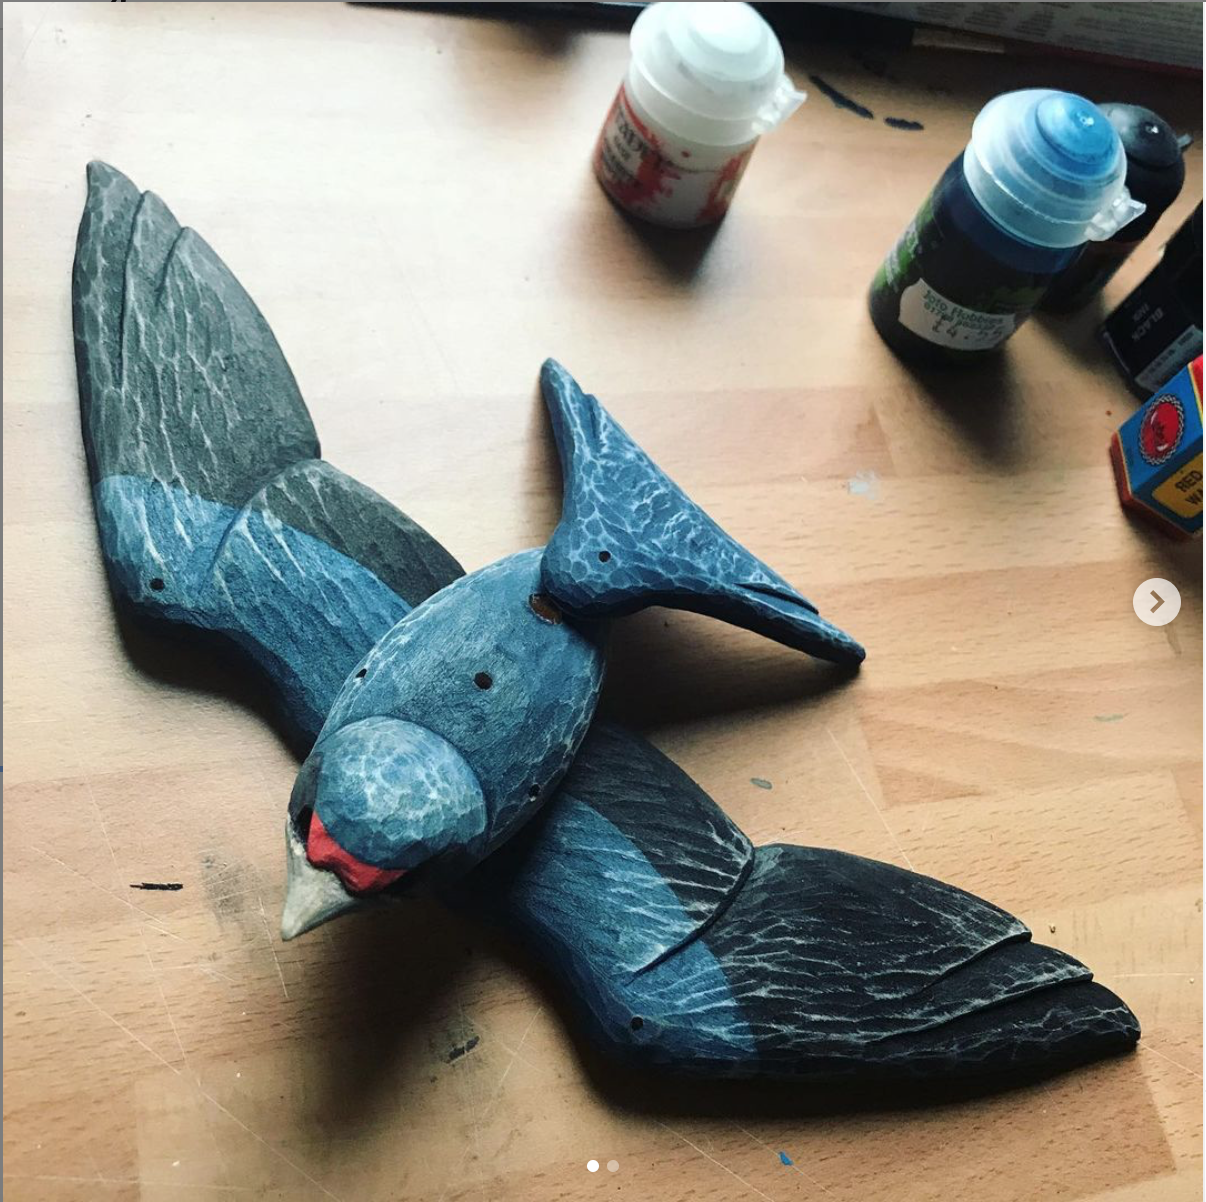
Adding COLOUR
Please refer to Video 3 and the KIT LIST above for information on the dyes, paints, oils and other equipment you will need for this section. PLEASE NOTE: there is one extra tool that you will need for Video 27 that I forgot to mention in Videos 2-3: you will need a small fine-tooth hand saw eg. a hacksaw, a coping saw or a Japanese pull saw.
ALLERGEN ADVICE - relating to the dyes, paints, and oils used in these videos
Bolgers Water Based Wood Stains are environmentally friendly, non-toxic, odourless and VOC free. They are unlikely to cause skin irritations.
Milk paint is made from casein (a protein found in milk) and lime. It is non-toxic, VOC-free & biodegradable. However, as it is a milk product, it may be unsuitable for severe dairy allergy sufferers. Use chalk paint or acrylic paint as an alternative.
Rustins Danish oil is not VOC free, though I only use it in very small quantities. It conforms to The Articles in Contact with Food Regulations and to the Toys (Safety) Regulations 1995, BS:EN71 Part 3. However, please note that Danish Oil contains tung oil which is extracted from nuts, and may therefore be unsuitable for severe nut allergy sufferers. Use at your own discretion, or contact Rustins Ltd for more information about their products.
(Video 27) Adding COLOUR part 1/4 - PREPARING to paint
----CONTENTS OF THIS VIDEO--------------
0:21 An introduction to the painting stages...
1:06 FYI you will need a SMALL SAW to remove the holding sticks!
1:37 Step 1 (removing the holding stick from the body)
2:18 Step 2 (whittling the stump)
3:19 Step 3 (removing the holding stick from the tail)
4:26 Step 4 (rounding off the tail stump)
5:33 Step 5 (slimming down the tail stump)
7:07 Step 5 (continued)
8:06 The puppet pieces before painting: final drawing up
(Video 28) Adding COLOUR part 2/4 - STAINING the SWALLOW with water-based wood dyes
----CONTENTS OF THIS VIDEO--------------
0:00 General introduction
1:10 Why I like using water-based wood dyes...
3:32 Painting the swallow (COLOUR GUIDE)
4:33 Step 1 (painting the swallow wings with BLACK)
5:46 Step 2 (painting the swallow wings with BLUE/BLACK)
6:21 Step 3 (painting the swallow wings with dilute ORANGE)
7:01 Step 4 (painting the swallow tail with BLUE/BLACK)
7:40 Step 5 (painting the swallow tail with dilute ORANGE)
8:11 Step 6 (painting the swallow body with RED)
9:07 Step 7 (painting the swallow body with BLACK)
9:52 Step 8 (painting the swallow body with BLUE/BLACK)
10:59 Step 9 (painting the swallow body with dilute ORANGE)
11:32 Step 10 (painting the swallow beak with dilute BLACK)
12:19 Step 11 (apply extra coats if needed)
13:00 The SWALLOW pieces, AFTER staining...
(Video 29) Adding COLOUR part 3/4 - STAINING the GOLDFINCH with water-based wood dyes
----CONTENTS OF THIS VIDEO--------------
0:00 General introduction
1:11 Why I like using water-based wood dyes...
3:49 Painting the goldfinch (COLOUR GUIDE)
4:41 Step 1 (painting the goldfinch wings with BLACK)
5:56 Step 2 (painting the goldfinch wings with YELLOW)
6:52 Step 3 (painting the goldfinch wings with BROWN/BLACK)
8:40 Step 4 (painting the goldfinch tail with BLACK)
9:32 Step 5 (painting the goldfinch tail with dilute BROWN)
10:00 Step 6 (painting the goldfinch body with RED)
11:09 Step 7 (painting the goldfinch body with BLACK)
12:36 Step 8 (painting the goldfinch body with BROWN)
13:57 Step 9 (painting the goldfinch face with under-washes)
14:55 Step 10 (applying extra coats if needed)
15:19 The GOLDFINCH pieces, AFTER staining...
(Video 30) Adding COLOUR part 4/4 - SANDING, PAINTING and OILING
----CONTENTS OF THIS VIDEO--------------
0:21 An introduction to the 3 PROCESSES in this video
1:21 A recap of what you will need...
2:09 A recap of all the puppet pieces AFTER staining (swallow AND goldfinch) 3:05 Process 1: SANDING with fine sandpaper
7:25 Process 2: PAINTING with white milk paint
10:34 Process 3: Sealing the wood with DANISH OIL
13:01 The puppet pieces, READY FOR ASSEMBLY
Assembling the PUPPET
Please refer to Video 3 and the KIT LIST for further information on the equipment you will need for this section.
PLEASE NOTE: In addition to the equipment listed, you might find some wood filler useful for attaching the tail in Video 31. I recommend 'Plastic Wood’ filler by Rustins. You may also find some coarse sandpaper useful for sanding the control bars in Video 32.
ALLERGEN ADVICE - relating to the equipment used in these videos
Araldite glue and UHU glue are toxic if consumed and can cause skin irritations. Keep away from children. If you have sensitive skin wear gloves when using these glues. Both glues are also toxic if inhaled so use them in a well ventilated area, or wear a mask.
If you have sensitive skin, asthma, or severe allergies please take due caution when using any of the materials listed in these videos.
(Video 31) ASSEMBLING the puppet part 1/2 - Assembling the EYES, WINGS and TAIL
----CONTENTS OF THIS VIDEO--------------
0:00 General introduction
1:22 Attaching the GLASS EYES: you will need...
2:11 Attaching the eyes STEP 1
2:36 Attaching the eyes STEP 2
3:11 Attaching the eyes STEP 3
4:52 Attaching the eyes STEP 4
5:11 Attaching the eyes STEP 5
6:50 Attaching the TAIL: you will need...
7:37 Attaching the tail STEP 1
9:04 Attaching the tail STEP 2
9:38 Attaching the tail STEP 3
11:12 Attaching the tail STEP 4
12:03 Attaching the tail STEP 5
12:40 Attaching the WINGS: you will need...
13:17 Attaching the wings STEP 1
15:00 Attaching the wings STEP 2 (optional)
17:30 Attaching the wings STEP 3
19:04 Attaching the wings STEP 4 (optional)
(Video 32) ASSEMBLING the puppet part 2/2 - Assembling and adding the CONTROL
----CONTENTS OF THIS VIDEO--------------
0:00 General introduction
0:47 Assembling the CONTROL: you will need...
1:41 Assembling the control STEP 1
2:02 Assembling the control STEP 2
3:00 Assembling the control STEP 3
3:37 Assembling the control STEP 4
4:23 Assembling the control STEP 5
5:20 Assembling the control STEP 6
5:59 Attaching the CONTROL: you will need...
6:46 Attaching the control STEP 1
7:52 Attaching the control STEP 2
9:29 Attaching the control STEP 3
12:56 SWALLOW tail feathers
13:35 Thank you and feedback!